Creating an IIS Web Server Farm with DFSR and Shared Configuration

In a previous article we configured a single IIS webserver using powershell commands.

Now we want to add some additional servers that will run the same web-sites so that we can load balance incoming requests.

The first step is to create one or more additional web servers using the instructions in the previous article however in this case we don’t need to create folders, file shares or create any websites or application pools in IIS. We are going to sync all of that stuff from our master server using DFS Replication.

Installing DFS Replication on each web server

  • Install-WindowsFeature -Name FS-DFS-Replication -Confirm

Create WebFarmFiles Folder (if required) on each web server

  • New-Item -ItemType Directory -Path C:\WebFarmFiles

Install management tools on a Full GUI machine

Unfortunately the DFS management tools (even the powershell cmdlets) can only be installed on a Windows computer with a full GUI at this stage for some reason. Therefore, you will need to have another server (or workstation) that you can use to manage your DFS Replication Group. I am not sure why this is the case, but hopefully Microsoft fix it soon.

  • Install-WindowsFeature -Name RSAT-DFS-Mgmt-Con -Confirm
  • Get-DfsReplicationGroup this cmdlet should run once the tools are installed.

Create a DFS Replication Group

As we have been forced onto a Full GUI machine, you could do the DFS setup using the DFS Management console. Since we are having so much fun though let’s keep going with setting everything up via Powershell.

Run the following command from the Full GUI management machine. Replace ‘YourGroup’ and ‘your.domain’ with the relevant values and feel free to modify the description to suit.

  • New-DfsReplicationGroup -GroupName YourGroup -DomainName your.domain -Description
    "DFS Replication between YourGroup servers to sync content and configuration" -Confirm

Add Members to the DFSR Group

Run the following command for each ComputerName that needs to be added to YourGroup.
Add-DfsrMember -GroupName YourGroup -ComputerName WEB0X -Confirm

Add DFS Replicated Folder

  • New-DfsReplicatedFolder -GroupName YourGroup -FolderName WebFarmFiles -Confirm

Add Connections between web servers

The command below creates a bi-directional connection between the servers WEB01 and WEB02. You can configure various configurations with this command, for example you may like a ‘hub and spoke’ type setup where WEB02, WEB03 etc are all connected to WEB01 but not each other. You might also choose to connect each server with every other server in more of a ‘full mesh’ setup. ie (WEB01 <-> WEB02, WEB01 <-> WEB03 AND WEB02 <-> WEB03).
Add-DfsrConnection -GroupName YourGroup -SourceComputerName WEB01 -DestinationComputerName WEB02 -Confirm

Configure the Primary server’s membership (and set the Staging Quota to 8GB)

  • Set-DfsrMembership -GroupName YourGroup -FolderName WebFarmFiles -ContentPath C:\WebFarmFiles -StagingPathQuotaInMB 8192 -ComputerName WEB01 -PrimaryMember $true -Confirm

Configure the other members

  • Set-DfsrMembership -GroupName YourGroup -FolderName WebFarmFiles -ContentPath C:\WebFarmFiles -StagingPathQuotaInMB 8192 -ComputerName WEB02, WEB03 -Confirm

Associated cmdlets to explore:
Get-DfsrBacklog -GroupName YourGroup -SourceComputerName WEB0X -DestinationComputerName WEB0Y
More here: https://docs.microsoft.com/en-us/powershell/module/dfsr/set-dfsrconnection?view=win10-ps
Get-EventLog -LogName 'DFS Replication' -Newest 20 to check for DFSR errors
Get-EventLog -LogName 'DFS Replication' -Newest 20 | Format-List message for full message details
Restart-Service -Name DFSR this may need to be run on all existing servers after adding a new member to the group

Exporting IIS Configuration for Sharing

On the initial web server that we set up in the last article, you should already have a website and application pool set up. Rather than creating all of those settings again, let’s export the configuration so that we can use it on all of our web servers. Placing this file in our DFS folder will ensure that all of the web servers stay in sync as configuration changes are made.
New-Item -ItemType Directory -Path C:\WebFarmFiles\Configuration
$KeyEncryptionPassword = ConvertTo-SecureString -AsPlainText -String "SecurePa$$w0rd" -Force
Export-IISConfiguration -PhysicalPath "C:\WebFarmFiles\Configuration" -KeyEncryptionPassword $keyEncryptionPassword

You should now have 3 files in the C:\WebFarmFiles\Configuration folder.

Enabling IIS Shared Configuration

Now that our IIS configuration from the initial server has been exported. All of our web servers (including the initial server) need to be set to look at our Shared Configuration files. As DFS is handling the synchronisation of these files between our servers, we can simply point each one to the C:\WebFarmFiles\Configuration folder and they will all be able to read and write changes to the configuration. On each server, run:
$KeyEncryptionPassword = ConvertTo-SecureString -AsPlainText -String "SecurePa$$w0rd" -Force
Enable-IISSharedConfig -PhysicalPath "C:\WebFarmFiles\Configuration\" -KeyEncryptionPassword $KeyEncryptionPassword

And that’s pretty much it. Your web servers should now all be up and running with the same sites that you had configured on the initial server. You can test each one by updating your hosts file to point to the individual IP address of each server and testing in the browser one by one. And obviously the next step from here is to configure a load balancer like HAProxy or NGINX to direct traffic across all of the servers in a fair and reasonable fashion. Stay tuned for the next episode.
Install and configure IIS on Windows Server Core 2016

In a previous post we covered using the System Preparation Tool to convert a VM into a VM Template in XenServer. Once we have used this template to create a new VM, it’s time to set it up as an IIS web server to host some ASP.Net MVC applications.

Revisiting the Basics

Network Settings

When creating a new VM from the template the network settings in the template will also be copied. If it was set to DHCP that will be fine but if the template had a static IP, you should change the IP address to a different one now so that you don’t run into an IP conflict (ie. Two machines on the network using the same IP address).
start powershell
sconfig
– Select 8) Network Settings
– Select the relevant Network Adapter from the list
– Select 1) Set Network Adapter Address
– Enter S for (S)tatics
– Enter the static IP address
– Enter the subnet mask
– Enter the default gateway
– If required select 2) Set DNS Servers

Advanced Networking

In some cases you may need to get a little more fancy with your networking. For example you may need to set your default gateway to a gateway router that can get your traffic out to the Internet, but you have a backend gateway router that handles communication to IP addresses on your private LAN. In this case you can use the route command to tell Windows to send traffic out through different gateway routers.
route print will show current routes, note the current default gateway route (0.0.0.0)
route add 10.0.0.0 mask 255.0.0.0 10.x.x.x -p will send all traffic destined for IP addresses in the 10.0.0.0/8 subnet (ie. Any address starting with ’10.’) out through the 10.x.x.x IP address (backend gateway router). The -p signifies that the route will be persistent and therefore will stick around after a reboot.
route print will now show your new persistent route both in the Active Routes section and below that under Persistent Routes.

Now that you have this route to the private LAN in place, you can change the default gateway address to the ‘Internet’ gateway server without loosing access to your server over the private LAN. This can be done by reconfiguring the network settings again using sconfig or by simply deleting the default route and adding another one.
route delete 0.0.0.0
route add 0.0.0.0 mask 0.0.0.0 10.y.y.y -p will send all traffic destined for an IP that can’t be handled by a more specific route out via the 10.y.y.y router. In this case you would replace the 10.y.y.y with the IP address of your Internet gateway router.

Enable Echo Requests (pings)

This step is optional but if you are going to monitor your server with something like Nagios you probably want to make sure it is online. This will enable the default rule to allow inbound IPv4 pings.
Set-NetFirewallRule -Name FPS-ICMP4-ERQ-In -Enabled True

Checking Internet Access

Many websites rely on web based resources (API’s etc). Now would be a good time to check that your new server has Internet access (unless you are purposely restricting it).
Invoke-WebRequest https://google.com -UseBasicParsing

This will show a big red error if it can’t hit Google, or a 200 status code if it can.

Join an Active Directory Domain

If you need to join your server to a domain to make management easier, follow these steps otherwise continue on to the next section to install IIS.
sconfig
– Select 2) Computer Name
– Set the new computer name and reboot the server
– After the reboot completes, log in again with the Administrator user
sconfig
– Select 1) Domain/WorkGroup
– Type D for (D)omain
– Enter the name of the domain you wish to join and the relevant administrator credentials
– You will be prompted to change the computer name again, click No as we have already done this.
– Click Yes on the Restart prompt
– After rebooting users should be able to login with your domain credentials.

Switching users on the Server Core login screen

If you are using Remote Desktop you should have a normal sign in experience but if you are still looking at the server’s console with just a CMD window on screen, it may not be immediately obvious how to switch users to log in with your domain credentials instead of the default administrator account. Here’s how:
– To change users hit the ESC at the LoginUI.exe screen
– This will present another sign-on options screen, hit ESC again
– Select Other User
– Enter your domain credentials and log in.

Installing the Web Server Role

Powershell comes with some very useful tools for managing the Window Features that are installed on a server
start powershell to open a powershell window
Install-WindowsFeature -Name Web-Server -Confirm will install IIS.
Get-WindowsFeature will show you a list of all available features and show which are installed.

At this point you should have a base install of IIS running the default website on port 80. If you open a browser and type in the IP address of the server you should see the default IIS website.

Install ASP.NET Support

  • Install-WindowsFeature -Name Web-Asp-Net45, Web-Net-Ext45 -Confirm

Installing IIS Diagnostic, Performance and Security Goodies

  • Install-WindowsFeature -Name Web-Custom-Logging, Web-Log-Libraries, Web-Request-Monitor, Web-Http-Tracing -Confirm
  • Install-WindowsFeature -Name Web-Performance -IncludeAllSubFeature -Confirm
  • Install-WindowsFeature -Name Web-Security -IncludeAllSubFeature -Confirm

Installing and Enabling Remote Management for IIS

This will allow us to use the IIS Manager window on another computer to manage our server. Even though we’re installing this now, I won’t be using it to configure the server in the interest of trying to do as much as possible via powershell. The idea is to script all of the server setup so that it can be entirely automated.
Install-WindowsFeature -Name Web-Mgmt-Service -Confirm
Set-ItemProperty -Path HKLM:\SOFTWARE\Microsoft\WebManagement\Server\ -Name EnableRemoteManagement -Value 1
Set-Service -Name WMSvc -StartupType Automatic
Start-Service -Name WMSvc

Note: You will need to install the IIS Manager on the machine that you will be using to manage the server/s. To do this, run:
Install-WindowsFeature -Name Web-Mgmt-Tools -Confirm

Website File Structure

The default directory for storing website files for IIS is C:\inetpub\wwwroot. When configuring your websites though you can put the files wherever you like. To make things simpler if you want to sync your website files between multiple web servers or apply special permissions etc, I find it best to store files in a seperate folder.

To keep things organise when hosting multiple websites across multiple domains I like to organise the content on my IIS servers in the following folder structure:

C:
|_WebFarmFiles
|_Content
|_domain1.com
|_subdomain1
|_project1
|_blah.aspx
|_project2
|_subdomain2
|_domain2.com
|_subdomain1

So if you have a site that will live at the URL http://subdomain1.domain1.com/project1/blah.aspx then blah.aspx would be saved to the C:\WebFarmFiles\Content\domain1.com\subdomain1\project1\ folder.

This setup may look a little confusing at first but it will make sense if/when you need to host multiple sites and quickly find things. Of course your system of organising files may vary and it is, of course, personal preference.

  • New-Item -ItemType Directory C:\WebFarmFiles\Content\domain1.com\subdomain1 this should create all the required parent folders for us automatically.

Getting files onto the server

Create Network Share

  • New-SmbShare -Name WebFarmFiles -Path C:\WebFarmFiles -FullAccess "domain\group1", "domain\group2"
  • Copy files from another machine onto this one using the share \\server\WebFarmFiles.

You could also use robycopy or other utilities to copy files from another network share or download files from github etc.

Set up your first Website

Let’s say we copied some files to \\server\WebFarmFiles\Content\domain1.com\subdomain1 which are intended to be accessed at the URL http://subdomain1.domain1.com. Let’s also say that we want this website to run in it’s own Application Pool so that we can manage it’s resource usage easily rather than everything running in the DefaultAppPool

Create the IIS Application Pool

  • New-WebAppPool -Name subdomain1.domain1.com

Associated cmdlets to explore:
Remove-WebAppPool
Get-WebAppPoolState | Select *
Restart-WebAppPool -Name subdomain1.domain1.com

Change the App Pool Identity

In some cases, the process running your application may need to access files on the network with specific user permissions.
Set-ItemProperty IIS:\AppPools\app-pool-name -name processModel -value @{userName="domain\user";password="password";identitytype=3}

Set the App Pool startMode

If your application is a big one, you may wish to set it to AlwaysRunning so that the first visitor doesn’t have to wait for it to initialise:
Set-ItemProperty IIS:\AppPools\app-pool-name -Name startMode -Value AlwaysRunning
Get-ItemProperty IIS:\AppPools\app-pool-name -Name startMode to check the setting.

Create the IIS WebSite

  • New-Website -Name subdomain1.domain1.com -ApplicationPool subdomain1.domain1.com -HostHeader subdomain1.domain1.com -PhysicalPath C:\WebFarmFiles\Content\domain1.com\subdomain1\

Associated cmdlets to explore:
Get-Website
Remove-WebSite -Name subdomain1.domain1.com
Stop-Website -Name subdomain1.domain1.com
Start-Website -Name subdomain1.domain1.com

The new website should now be running and you can access it by pointing the subdomain1.domain1.com URL at your servers IP address either just from your local machine by modifying your hosts file or by modifying the DNS records for the domain1.com domain. These methods are not covered in this article.

Adding an additional binding

In some cases you may have a need to point two different URL’s at the same website.

  • New-Binding -Name subdomain1.domain1.com -HostHeader subdomain1.domain3.com

In this case, the ‘Name’ of the binding relates to the WebSite it will be linked to.

Associated cmdlets to explore:
Get-WebBinding
Get-WebBinding | Select-Object * for a more advanced view
Remove-WebBinding -HostHeader subdomain1.domain3.com

ASPState Database on SQL AlwaysOn Availability Group

Running your ASPState database in a SQL AlwaysOn Availability Group provides redundancy in case there is a SQL server failure.

Unfortunately the default process for setting up the ASPState database does not take this configuration into account and you may find that your ASPState database has an ever expanding data file that is using all of your disk space.

When the ASPState database is created, there is also a SQL Agent job that is also created which deletes expired sessions to keep the database size at a reasonable level. This job is usually called:

ASPState_Job_DeleteExpiredSessions

In the usual setup, this job runs every minute and simply fires of a Store Procedure which lives in the ASPState database itself using the following T-SQL statement:

EXECUTE DeleteExpiredSessions

Generally this all works well. The issue arises when the Availability Group is failed over to a secondary availability replica. Because the SQL Agent job is not present on this server, the expired sessions are no longer deleted and the database begins to grow.

You may notice on the SQL server that was originally the primary availability replica that there are errors in the SQL Agent job history similar to this:

Date 24/04/2018 11:45:00 AM
Log Job History (ASPState_Job_DeleteExpiredSessions)

Step ID 1
Server [serverName]
Job Name ASPState_Job_DeleteExpiredSessions
Step Name ASPState_JobStep_DeleteExpiredSessions
Duration 00:00:08
Sql Severity 16
Sql Message ID 3906
Operator Emailed
Operator Net sent
Operator Paged
Retries Attempted 0

Message
Executed as user: [domain\user]. Failed to update database "ASPState" because the database is read-only. [SQLSTATE 25000] (Error 3906). The step failed.

This is because the database the job is trying to run against has now become the read-only secondary replica database. If you are quickly running out of disk space and need to fix this problem, then log on to the primary replica and simply run the following:

USE [ASPState]
GO

EXECUTE DeleteExpiredSessions

The next logical step would be to simply set up a matching SQL Agent Job on the all servers that will delete the old sessions regardless of which server is the primary replica at the time. This is definitely the next step, however this will continue to generate errors on all the servers that are running as secondary replicas.

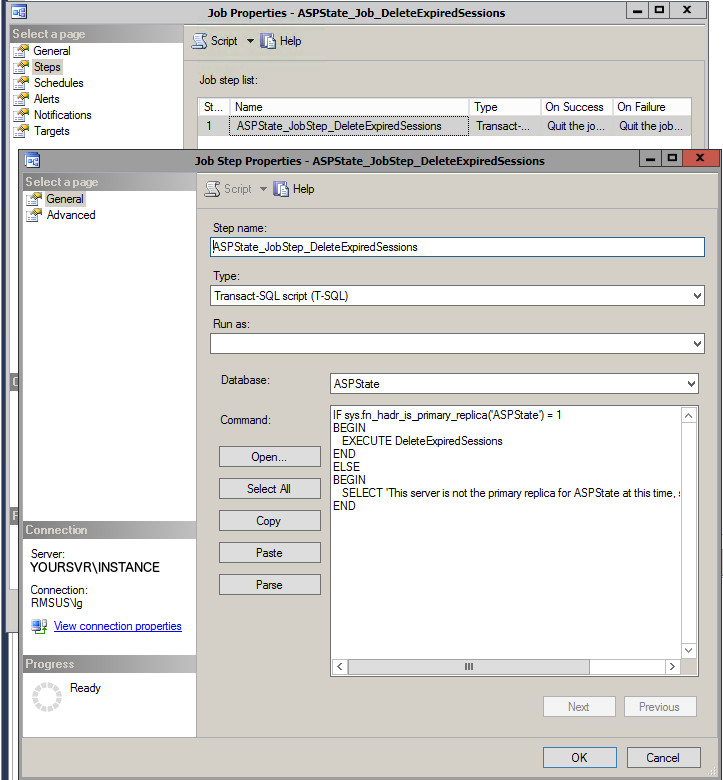
Fortunately though, SQL Server provides a better long term solution that will resolve the issue and save us writing out unnecessary errors. All we need to do is update the T-SQL statement that the Agent jobs run (on each of the replica servers) to look like the following:

IF sys.fn_hadr_is_primary_replica('ASPState') = 1
BEGIN
EXECUTE DeleteExpiredSessions
END
ELSE
BEGIN
SELECT 'This server is not the primary replica for ASPState at this time, skipping maintenance.'
END

This will check whether the server that the job is running on is the primary replica for the ASPState database and only run the maintenance stored procedure if it is.

Here’s what it would look like:

aspstate agent job
ASPState SQL Agent Job

Windows Server Core 2016 Initial (XenServer) Template Setup

After installing Windows Server Core 2016 you might wander what to do with yourself next. If, like most people, you have always used Windows via the GUI then you are entering a whole new world. Being presented with only a CMD window on startup will be a little daunting at first. But you will learn how to drive it with a little practise. Here are some tips to get you started with configuring your first Server Core install and converting it to a Template so that you can create many more instances.

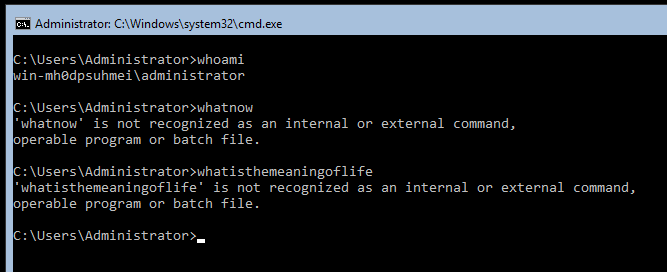
server core first command
The Windows Server Core 2016 User Interface

Launching Programs

As you have probably already noticed, Windows Server Core does still have a GUI of sorts. There is still a desktop that the CMD window sits on. You can also still open and run programs. For example:
notepad will launch a notepad window.
taskmgr will launch the Task Manager.
powershell will launch a powershell session (in the current CMD window)
start powershell will launch a seperate powershell window.

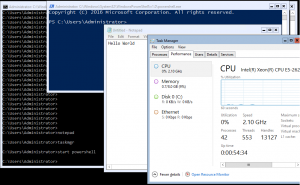
server core programs
Programs running in Windows Server Core 2016

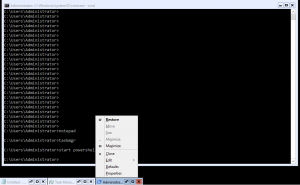
These programs can still be minimised and maximised, they just don’t sit on a ‘Task Bar’. Instead they just minimise down to small tiles that live along the bottom of the screen. For those of you that used Windows 3.1 you will remember how this works (showing my age here).

minimised programs on server core
Minimised programs on Windows Server Core 2016

Installing XenTools

  • Insert the XenTools ISO into the VM via XenCenter
  • start powershell to open a seperate powershell window because it’s much more… powerful.
  • cd d: to change to our CD drive (replace d: with whatever letter your CD drive would be)
  • start .\Setup.exe to launch the setup wizard. Even though we have no GUI, this will still run like it always has.
  • Run through the wizard selecting the usual options. I usually disable the automatic updates for better control.

Configuring the Basics

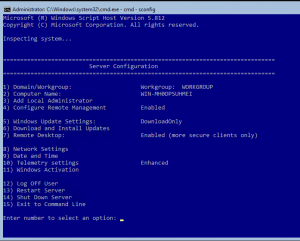
The ‘Server Configuration’ command line utility is a great way to configure the basic settings on your server to get it on the network and connected to your domain etc. This screen may just handle the bulk of the configuration that you require on your server. You can launch it from CMD or powershell by typing sconfig.

sconfig-main-menu
Windows Server Configuration Utility Main Menu

Network Settings

  • sconfig
  • Select option 8) Network Settings
  • Follow the prompts to configure your network adapters

Remote Desktop

  • sconfig
  • Select option 7) Remote Desktop
  • At this point you should be able to connect to the VM via XenCenter’s Remote Desktop console or any orther RDP client.

Windows Updates

  • sconfig
  • Select option 6) Download and Install Updates
  • Follow the prompts to install your updates.

NB: If you are behind a firewall or on a private network with no Internet access, you may need to point your VM at a WSUS server.

Configuring Windows Updates to point to a WSUS Server

If you have a WSUS server on your LAN, you can configure the VM to use it by substituting the relevant address into the commands below. For example for servers on Softlayer/IBM’s private LAN you can use http://wsus01.service.softlayer.com. This may not be required if you push out the WSUS settings via a Group Policy on your domain. I always like to do updates before I join VM’s to the domain though, just out of habit (best practise?).

  • start powershell
  • Set-ItemProperty -Path HKLM:\SOFTWARE\Policies\Microsoft\Windows\WindowsUpdate -Name WUServer -Value http://your.wsus.hostname
  • Set-ItemProperty -Path HKLM:\SOFTWARE\Policies\Microsoft\Windows\WindowsUpdate -Name WUStatusServer -Value http://your.wsus.hostname
  • Set-ItemProperty -Path HKLM:\SOFTWARE\Policies\Microsoft\Windows\WindowsUpdate\AU -Name UseWUServer -Value 1
  • To check that these registry settings have all saved properly you can use the powershell Get-Item commandlet:
  • Get-Item -Path HKLM:\SOFTWARE\Policies\Microsoft\Windows\WindowsUpdate
  • Get-Item -Path HKLM:\SOFTWARE\Policies\Microsoft\Windows\WindowsUpdate\AU
  • If you re-run the Windows Updates in sconfig now you should now pull updates from the WSUS server.

In the old ‘GUI’ days, this would have done this by opening MMC, adding the Group Policy Snap-in and then finding the policies that control the registry keys we are editing here. MMC does not come with Server Core but you can connect to it from a remote ‘full install’ windows machine that has MMC. There is some setup required to make this work however which I won’t cover here.

Converting the VM to a Template (SysPrep)

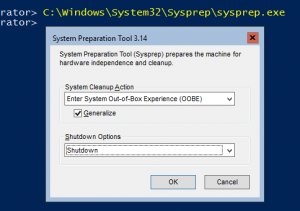
To convert this VM to a template we need to ‘reset’ Windows using the System Preparation Tool. This will mean that when we clone the VM Template we will be creating a fresh new VM rather than a copy of the existing one with the same hostname etc.

sysprep
System Preparation Tool
  • start powershell
  • C:\Windows\System32\Sysprep\sysprep.exe
  • Under System Cleanup Action select Enter System Out-of-Box Experience (OOBE)
  • Tick Generalize
  • Under Shutdown Options select Shutdown
  • Wait for the VM to completely shutdown
  • In XenCenter, right click the VM
  • Select Convert to Template…
  • Click Convert
  • The template is now ready to be used to create new VM from

Creating a new VM

  • In XenCenter, click VM (Top Menu)
  • Select New VM…
  • Select the template you just created
  • Continue through the wizard selecting the relevant options.

In the next post I’ll show you how to configure our new VM as an IIS server.

Removing Old Kernel Images from /lib/modules

So using my handy-dandy ‘HDGraph for Linux’ command, I recently identified an Ubuntu (10.04.4 LTS) server that had a bloated /lib/modules directory.

me@there:/lib/modules$ ls -al
total 140
drwxr-xr-x 33 root root  4096 2017-06-02 18:10 .
drwxr-xr-x 13 root root 12288 2015-04-02 06:42 ..
drwxr-xr-x  4 root root  4096 2014-05-29 12:25 2.6.32-41-generic
drwxr-xr-x  4 root root  4096 2014-05-29 12:25 2.6.32-42-generic
drwxr-xr-x  4 root root  4096 2014-05-29 12:25 2.6.32-43-generic
drwxr-xr-x  4 root root  4096 2014-05-29 12:25 2.6.32-44-generic
drwxr-xr-x  4 root root  4096 2014-05-29 12:25 2.6.32-45-generic
drwxr-xr-x  4 root root  4096 2014-05-29 12:25 2.6.32-46-generic
drwxr-xr-x  4 root root  4096 2014-05-29 12:26 2.6.32-47-generic
drwxr-xr-x  4 root root  4096 2014-05-29 12:26 2.6.32-48-generic
drwxr-xr-x  4 root root  4096 2014-05-29 12:26 2.6.32-49-generic
drwxr-xr-x  4 root root  4096 2014-05-29 12:26 2.6.32-50-generic
drwxr-xr-x  4 root root  4096 2014-05-29 12:26 2.6.32-51-generic
drwxr-xr-x  4 root root  4096 2014-05-29 12:26 2.6.32-52-generic
drwxr-xr-x  4 root root  4096 2014-05-29 12:27 2.6.32-53-generic
drwxr-xr-x  4 root root  4096 2014-05-29 12:27 2.6.32-54-generic
drwxr-xr-x  4 root root  4096 2014-05-29 12:27 2.6.32-55-generic
drwxr-xr-x  4 root root  4096 2014-05-29 12:27 2.6.32-56-generic
drwxr-xr-x  4 root root  4096 2014-05-29 12:27 2.6.32-57-generic
drwxr-xr-x  4 root root  4096 2014-05-29 12:27 2.6.32-58-generic
drwxr-xr-x  4 root root  4096 2015-01-16 16:55 2.6.32-60-generic
drwxr-xr-x  4 root root  4096 2015-01-16 16:55 2.6.32-61-generic
drwxr-xr-x  4 root root  4096 2015-01-16 16:55 2.6.32-62-generic
drwxr-xr-x  4 root root  4096 2015-01-16 16:55 2.6.32-64-generic
drwxr-xr-x  4 root root  4096 2015-01-16 16:56 2.6.32-65-generic
drwxr-xr-x  4 root root  4096 2015-01-16 16:56 2.6.32-66-generic
drwxr-xr-x  4 root root  4096 2015-01-16 16:56 2.6.32-67-generic
drwxr-xr-x  4 root root  4096 2015-01-16 16:56 2.6.32-68-generic
drwxr-xr-x  4 root root  4096 2015-01-16 16:56 2.6.32-70-generic
drwxr-xr-x  4 root root  4096 2017-03-29 16:08 2.6.32-71-generic
drwxr-xr-x  4 root root  4096 2017-03-29 16:08 2.6.32-72-generic
drwxr-xr-x  4 root root  4096 2017-03-29 16:08 2.6.32-73-generic
drwxr-xr-x  4 root root  4096 2015-04-30 06:52 2.6.32-74-generic

These files are most likely on your system because you have automatic apt-get updates enabled, which is a good thing, but disk space is important also. It should be fine to remove the files, but files that are related to system updates, especially anything that mentions the ‘kernel’ make me nervous, how about you?

After a small amount of googling to see whether it was safe to just delete these files or not, I think I found the ‘correct’ way to clean them up.

One guy suggested using ‘sudo apt-get autoremove’ but this didn’t help at all.

Another forum thread had a suggestion to use the dpkg command with the -r or ‘remove’ parameter. This not only removes the large file itself but also marks the debian package that created the file as ‘removed’ (and it probably does some other cool stuff that will stop you having problems later on also).

If you are anything like me, you will want to understand things a little bit better before blindly copying and pasting commands that you have never seen before. So here goes:

To list all installed packages:
me@there:/lib/modules$ sudo dpkg-query -l | grep linux-image

To show only the relevant entries:

me@there:/lib/modules$ sudo dpkg-query -l | grep linux-image
rc  linux-image-2.6.32-40-generic   2.6.32-40.87                        Linux kernel image for version 2.6.32 on x86
ii  linux-image-2.6.32-41-generic   2.6.32-41.91                        Linux kernel image for version 2.6.32 on x86
ii  linux-image-2.6.32-42-generic   2.6.32-42.96                        Linux kernel image for version 2.6.32 on x86
ii  linux-image-2.6.32-43-generic   2.6.32-43.97                        Linux kernel image for version 2.6.32 on x86
ii  linux-image-2.6.32-44-generic   2.6.32-44.98                        Linux kernel image for version 2.6.32 on x86
ii  linux-image-2.6.32-45-generic   2.6.32-45.104                       Linux kernel image for version 2.6.32 on x86
ii  linux-image-2.6.32-46-generic   2.6.32-46.108                       Linux kernel image for version 2.6.32 on x86
ii  linux-image-2.6.32-47-generic   2.6.32-47.109                       Linux kernel image for version 2.6.32 on x86
ii  linux-image-2.6.32-48-generic   2.6.32-48.110                       Linux kernel image for version 2.6.32 on x86
ii  linux-image-2.6.32-49-generic   2.6.32-49.111                       Linux kernel image for version 2.6.32 on x86
ii  linux-image-2.6.32-50-generic   2.6.32-50.112                       Linux kernel image for version 2.6.32 on x86
ii  linux-image-2.6.32-51-generic   2.6.32-51.113                       Linux kernel image for version 2.6.32 on x86
ii  linux-image-2.6.32-52-generic   2.6.32-52.114                       Linux kernel image for version 2.6.32 on x86
ii  linux-image-2.6.32-53-generic   2.6.32-53.115                       Linux kernel image for version 2.6.32 on x86
ii  linux-image-2.6.32-54-generic   2.6.32-54.116                       Linux kernel image for version 2.6.32 on x86
ii  linux-image-2.6.32-55-generic   2.6.32-55.117                       Linux kernel image for version 2.6.32 on x86
ii  linux-image-2.6.32-56-generic   2.6.32-56.118                       Linux kernel image for version 2.6.32 on x86
ii  linux-image-2.6.32-57-generic   2.6.32-57.119                       Linux kernel image for version 2.6.32 on x86
ii  linux-image-2.6.32-58-generic   2.6.32-58.121                       Linux kernel image for version 2.6.32 on x86
ii  linux-image-2.6.32-60-generic   2.6.32-60.122                       Linux kernel image for version 2.6.32 on x86
ii  linux-image-2.6.32-61-generic   2.6.32-61.124                       Linux kernel image for version 2.6.32 on x86
ii  linux-image-2.6.32-62-generic   2.6.32-62.126                       Linux kernel image for version 2.6.32 on x86
ii  linux-image-2.6.32-64-generic   2.6.32-64.128                       Linux kernel image for version 2.6.32 on x86
ii  linux-image-2.6.32-65-generic   2.6.32-65.131                       Linux kernel image for version 2.6.32 on x86
ii  linux-image-2.6.32-66-generic   2.6.32-66.132                       Linux kernel image for version 2.6.32 on x86
ii  linux-image-2.6.32-67-generic   2.6.32-67.134                       Linux kernel image for version 2.6.32 on x86
ii  linux-image-2.6.32-68-generic   2.6.32-68.135                       Linux kernel image for version 2.6.32 on x86
ii  linux-image-2.6.32-70-generic   2.6.32-70.137                       Linux kernel image for version 2.6.32 on x86
ii  linux-image-2.6.32-71-generic   2.6.32-71.138                       Linux kernel image for version 2.6.32 on x86
ii  linux-image-2.6.32-72-generic   2.6.32-72.139                       Linux kernel image for version 2.6.32 on x86
ii  linux-image-2.6.32-73-generic   2.6.32-73.141                       Linux kernel image for version 2.6.32 on x86
ii  linux-image-2.6.32-74-generic   2.6.32-74.142                       Linux kernel image for version 2.6.32 on x86
ii  linux-image-generic             2.6.32.74.81                        Generic Linux kernel image

Now that we can see all the relevant info, let’s try deleting the oldest package:

me@there:/lib/modules$ sudo dpkg -r linux-image-2.6.32-41-generic 
(Reading database ... 148158 files and directories currently installed.)
Removing linux-image-2.6.32-41-generic ...
Running postrm hook script /usr/sbin/update-grub.
Generating grub.cfg ...
Found linux image: /boot/vmlinuz-2.6.32-74-generic
Found initrd image: /boot/initrd.img-2.6.32-74-generic
Found linux image: /boot/vmlinuz-2.6.32-73-generic
Found initrd image: /boot/initrd.img-2.6.32-73-generic
Found linux image: /boot/vmlinuz-2.6.32-72-generic
Found initrd image: /boot/initrd.img-2.6.32-72-generic
Found linux image: /boot/vmlinuz-2.6.32-71-generic
Found initrd image: /boot/initrd.img-2.6.32-71-generic
Found linux image: /boot/vmlinuz-2.6.32-70-generic
Found initrd image: /boot/initrd.img-2.6.32-70-generic
Found linux image: /boot/vmlinuz-2.6.32-68-generic
Found initrd image: /boot/initrd.img-2.6.32-68-generic
Found linux image: /boot/vmlinuz-2.6.32-67-generic
Found initrd image: /boot/initrd.img-2.6.32-67-generic
Found linux image: /boot/vmlinuz-2.6.32-66-generic
Found initrd image: /boot/initrd.img-2.6.32-66-generic
Found linux image: /boot/vmlinuz-2.6.32-65-generic
Found initrd image: /boot/initrd.img-2.6.32-65-generic
Found linux image: /boot/vmlinuz-2.6.32-64-generic
Found initrd image: /boot/initrd.img-2.6.32-64-generic
Found linux image: /boot/vmlinuz-2.6.32-62-generic
Found initrd image: /boot/initrd.img-2.6.32-62-generic
Found linux image: /boot/vmlinuz-2.6.32-61-generic
Found initrd image: /boot/initrd.img-2.6.32-61-generic
Found linux image: /boot/vmlinuz-2.6.32-60-generic
Found initrd image: /boot/initrd.img-2.6.32-60-generic
Found linux image: /boot/vmlinuz-2.6.32-58-generic
Found initrd image: /boot/initrd.img-2.6.32-58-generic
Found linux image: /boot/vmlinuz-2.6.32-57-generic
Found initrd image: /boot/initrd.img-2.6.32-57-generic
Found linux image: /boot/vmlinuz-2.6.32-56-generic
Found initrd image: /boot/initrd.img-2.6.32-56-generic
Found linux image: /boot/vmlinuz-2.6.32-55-generic
Found initrd image: /boot/initrd.img-2.6.32-55-generic
Found linux image: /boot/vmlinuz-2.6.32-54-generic
Found initrd image: /boot/initrd.img-2.6.32-54-generic
Found linux image: /boot/vmlinuz-2.6.32-53-generic
Found initrd image: /boot/initrd.img-2.6.32-53-generic
Found linux image: /boot/vmlinuz-2.6.32-52-generic
Found initrd image: /boot/initrd.img-2.6.32-52-generic
Found linux image: /boot/vmlinuz-2.6.32-51-generic
Found initrd image: /boot/initrd.img-2.6.32-51-generic
Found linux image: /boot/vmlinuz-2.6.32-50-generic
Found initrd image: /boot/initrd.img-2.6.32-50-generic
Found linux image: /boot/vmlinuz-2.6.32-49-generic
Found initrd image: /boot/initrd.img-2.6.32-49-generic
Found linux image: /boot/vmlinuz-2.6.32-48-generic
Found initrd image: /boot/initrd.img-2.6.32-48-generic
Found linux image: /boot/vmlinuz-2.6.32-47-generic
Found initrd image: /boot/initrd.img-2.6.32-47-generic
Found linux image: /boot/vmlinuz-2.6.32-46-generic
Found initrd image: /boot/initrd.img-2.6.32-46-generic
Found linux image: /boot/vmlinuz-2.6.32-45-generic
Found initrd image: /boot/initrd.img-2.6.32-45-generic
Found linux image: /boot/vmlinuz-2.6.32-44-generic
Found initrd image: /boot/initrd.img-2.6.32-44-generic
Found linux image: /boot/vmlinuz-2.6.32-43-generic
Found initrd image: /boot/initrd.img-2.6.32-43-generic
Found linux image: /boot/vmlinuz-2.6.32-42-generic
Found initrd image: /boot/initrd.img-2.6.32-42-generic
Found memtest86+ image: /boot/memtest86+.bin
done

Now the file should be gone from /lib/modules. This can be confirmed by running ls -alh /lib/modules.

If you run the sudo dpkg-query -l | grep linux-image command again you will notice that the package still shows up, but it now has an ‘rc’ listed next to it rather than an ‘ii’. This means that rather than having an installed status, the package status is now ‘Config-Files’ and the desired action is ‘Remove’ rather than ‘Install’.

Now just repeat the process for each remaining file in the folder to clean up as much disk space as you require. It might be prudent to leave the few most recent ones just in case you need to switch between kernel versions later or something along those lines (I really don’t know what the best practise is here, please let me know in the comments if you do).

To check your disk is now nice and healthy of course you can use df -h.

Enjoy! 🙂

HDGraph Equivalent for *nix Command Line

We all run low or run out of disk space every now and then. In fact, I’ve found as a sysadmin that this is one of the more frequent and annoying problems that pop up. Especially if you don’t have an easy way to figure out what is using all of that disk space.

I use HDGraph on Windows systems to do this and find it really helpful. I couldn’t live without it. Well I could, but I would have no storage left. There are some similar tools available for Linux desktops and Mac OS X also but on a headless Linux server all you have is the command line and your wits.

After a lot of googling, I found this great little command will help you find large files/folders on a Linux system. Well perhaps little is not the best choice of words, and it’s not super user friendly, but it does a great job.

The path in the command can be changed to focus on a specific folder. So to be very general you could start at / and then work your way into the biggest folder until you figure out where all that disk space has gone.

Show top 10 largest files or sub-folders in /var:
sudo du -a /var | sort -n -r | head -n 10

Show top 20 largest files or subfolders in the root folder /:
sudo du -a / | sort -n -r | head -n 20

Show the 11th-20th largest files in /var/log/:
sudo du -a /var/log/ | sort -n -r | head -n 20 | tail -n 10

The beauty of this command is that it uses standard utilities that are included with almost all *nix based operating systems including Linux and Mac OS X.

If you get this error then your hard drive is most likely 100% full and you may need to do some manual cleaning up first before you can start using the above command.
sort: write failed: /tmp/sort0uH5NO: No space left on device

Take a quick look in your home folder and in the log folders to see if there are a couple of files that you could do without. You should only need to clear a few KB of space before our handy-dandy command will have enough room to work with.

Home Directory:
cd /home/[username] or simply cd ~
rm someoldfile.1

Log Folders:
cd /var/log/
rm someoldlog.5.gz

Installing Ubuntu 1604 Server Edition on XenServer

Ubuntu is a great Linux distribution that can be used for a variety of tasks from a desktop operating system to forming the basis for a mail, web or VoIP server; it can even run your TV or pet robot. It has a fantastic community supporting it and over the last few years has become one of my favourite distributions for various reasons.

One big benefit of Ubuntu is the fact that they offer LTS (Long Term Support) releases which are supported and maintained with security patches for five years. This makes Ubuntu a great choice for business where it will be used in a production environment.

Today we are going to install the Server edition Ubuntu 1604 LTS on XenServer. Let’s get started.

Download the Ubuntu ISO

  • Navigate to www.ubuntu.com
  • Navigate to Downloads > Server
  • Download the latest LTS version. This article uses 1604 TLS.
  • Save the ISO image in your XenServer CIFS ISO share

Create Virtual Machine

  • Connect to your XenServer in XenCenter
  • On the top menu select VM > New VM
  • Select the Ubuntu Trusty Tahr 14.04 template and click Next
  • Set Name to the new server’s name
  • Set Description to have some relevant information about the purpose of the server, which OS and template are being used and when it was built and by whom.
  • Click Next
  • Select Install from ISO library or DVD drive:
  • Select the Ubuntu ISO that we downloaded earlier and click Next
  • If the XenServer is in a pool, select Don’t assign this VM a home server
  • Click Next
  • Set Number of vCPUs to 2 or more depending on the requirements
  • Set Memory to 2048 or more depending on the requirements
  • Click Next
  • Select the default 8GB disk and click Properties
  • Set Size to 16GB or more depending on the requirements
  • Click OK and Next
  • Select any network interfaces that are not required and click Delete
  • Click Next
  • Review the settings and then click Create Now
  • Select the new Virtual Machine from the tree on the left pain in XenCenter
  • Select the Console tab. To continue the installation.

Install Ubuntu

  • Set Language to English and hit enter
  • Select Install Ubuntu Server and hit enter
  • Set Language to English and hit enter
  • Set Country, territory or area to Australia and hit enter
  • Set Detect keyboard layout? to No and hit enter
  • Set Country of origin for the keyboard: to English (US) and hit enter
  • Set Keyboard layout to English (US) and hit enter
  • Set Hostname to the server’s hostname (eg. melbpabx03) and hit enter
  • Set Full name for the new user to your full name and hit enter
  • Set Username for your account to your preferred username and hit enter
  • Set Choose a password for the new user to your preferred password and hit enter
  • Retype the password and hit enter
  • Set Encrypt your home directory? to No and hit enter
  • Select Yes to accept the timezone or change it if required then hit enter
  • Set Partitioning method to *Guided – use entire disk and set up LVM** and hit enter
  • Check that the correct disk is selected (should only be one) and hit enter
  • Set Write the changes to disk and configure LVM? to Yes and hit enter
  • Set Amount of volume group to use for guided partitioning to use the entire disk and hit enter
  • Confirm the changes, select Yes and hit enter to Write the changes to disks
  • Leave HTTP Proxy blank and hit enter
  • Select Install security updates automatically and hit enter
  • Select Standard system utilities and OpenSSH server and hit ‘enter’
  • Set Install the GRUB boot loader to the master boot record to Yes and hit enter
  • Hit enter to reboot the VM (the ISO should automatically eject).

Getting the IP Address

Assuming that you have a DHCP server running on your network, your new VM should now have an IP address. Let’s find out what this address is, then we can connect to the server remotely via SSH to complete the configuration. You can use the terminal application if you are using a Mac or Linux machine or Putty if you are using Windows.

  • On the XenServer Console tab, login with the credentials you configured earlier.
  • ifconfig
  • Look for the line starting with inet addr: which should contain the server’s IP address
  • Use your ssh client to connect to the server’s IP address.

Install Xen-Tools

  • In XenCenter insert xs-tools.iso into DVD Drive 1: on the VM’s Console tab
  • sudo mount /dev/cdrom/ /mnt (ignore the warning about mounting read-only)
  • sudo /mnt/Linux/install.sh
  • sudo reboot
  • Eject xs-tools.iso from the DVD Drive 1

Install Updates

  • sudo apt-get update
  • sudo apt-get upgrade

Let the Ubuntu goodness begin

You now have an operational Ubuntu Server and are ready to take over the world. What will you build? Let us know what you would like to see us build. Enjoy.

The journey begins

And so it begins. The journey to a cloud masterpiece. My name is Lukas Gibb and I build and manage servers of all kinds that do amazing things all day, every day. They don’t sleep and hopefully neither will you while I share some of my knowledge on building cool stuff.

My Cloud journey began about 18 years ago (wow, that long?) when I started building websites for small businesses and created my first business with my Uni friend to make some extra cash. The word ‘Cloud’ wasn’t even used back then to refer to anything tech related. We were studying marketing and e-commerce at the time though and with some basic programming skills under our belts a career in web-design seemed logical.

I found out pretty quickly that although I understood how to make things ‘work’ on a web page, that I couldn’t design my way out of a wet paper bag (as you can probably see from this blog). I also learned that programming can really suck too; spending hours re-reading your code until you found the one extra semi-colon that you added (or forgot to add) which completely broke your beautiful page got tired pretty quickly.

Despite my first business giving way to the more social activities of University, I still had a passion for the web and the exciting landscape that was unfolding all around me and soon I was working hard on a second venture with another friend. This time it was a new payment system for the web that would allow online shoppers to make purchases without the need for a credit card. SmartCash was a pre-paid account which you could top up with funds at the bank or through direct deposit, BPay etc. It was a fantastic idea which was sure to change the online shopping world but as we were starting with zero card-holders and zero online stores had integrated our payment gateway it was a case of the chicken or the egg for two young guys with little actual marketing experience.

While we were working on building a user base and talking to online retailers about accepting SmartCash payments on their shopping carts, we needed another form of revenue to help fund our plans to take over the world. This is where I fell into the wonderful world of web hosting. We had a friend who had a small business hosting web sites for friends and contacts that he had met through his 9-5 job. We decided to all join forces and grew that list of clients ten-fold in the space of 6 months to a point where it became our main focus and SmartCash started to fall by the way-side. Coupled with the launch of Paypal’s Debit bank account integration, and our lack of marketing skills, it was unfortunately a lost cause.

So on we went to become Jumba, one of Australia’s fastest growing and leading budget web-hosts with thousands of websites running on our servers, all the while learning about how to build more robust and secure servers that could handle millions of requests a day for all the other busy entrepreneurs that were also working on their plans of world domination. Honing our marketing skills and working closely with our customers to build great solutions, not only in web hosting but also other services such as ADSL, Hosted PABX and enterprise email. We had a great little community of fellow geeks that helped us every step of the way. Even though this was before the days of social media, we mustered a loyal army of fans that were there to praise us and help sell our services to their friends, family and anyone else on the Internet that would listen.

I am very proud of the brand we created which is still around to this day (mostly un-changed) and was recently acquired by Melbourne IT/Netregisty in one of the biggest business deals in the Australian web hosting industry’s history. And although I sold out of the business much too early on to reap the benefits of the multi-million dollar deals taking place these days, it is still my baby and I’m glad to see it still doing well.

When I decided to take a break from the heavy personal pressures of life as an entrepreneur, I decided to get a ‘normal’ job. This took me into the wonderful world of being ‘the IT guy’ for several small and medium customers; working as a mobile tech installing and fixing networks, servers, VoIP systems and PC’s on and off site. I enjoyed the change of pace there and learned a lot about Windows servers and Active Directory which are a necessary evil in the small business landscape. This company has also seen phenomenal growth and the telephony division was recently acquired by a major Telco.

In an effort to find work closer to home, I then found a great job with a small software company catering to the hospitality industry. I joined at the cusp of a very exciting time of change for the company as it made the wise move of starting the transition from a locally installed and managed software product to a ‘Cloud’ hosted solution. With 25 years of old-school software experience, this process has been slow but steady and now that it is done, the company is beginning to grow exponentially and is poised to become one of the biggest hospitality software companies in the world.

This blog is an endeavour to share some of what I have learned along this journey and to help me to become a master of my trade. Like the tradesman of old who travelled the countryside refining their craft before becoming a master craftsman, I want to put my skills to good use and help to make the Cloud a better place. And so it begins, the journey to a Cloud masterpiece. Enjoy.